Issues
Issues are the main way you track work in Service Scout. Each issue is one customer request or job—for example a repair, a consultation, or a project.
Viewing issues
- All issues: Click Issues in the navigation menu to see the main issues table.
- By type: Click the menu item for a specific issue type (e.g. Tickets) to see only that type.
- Use the column headers to search and filter. Click an issue title or the blue eyeball (view) button to open it—you may need to scroll right to see the eyeball. Opening from the title or view button keeps you in the same browser tab so you do not accumulate duplicate issue tabs.
Viewing a single issue
- Go to an issues table (all issues or a type).
- Open the issue by either:
- Clicking the issue title (hyperlink), or
- Clicking the blue eyeball (view) button on the right.
Creating an issue
- Go to an issues table and click Create to open the issue creation form.
- Fill in as much as you can. Labor and parts cost can be left until later if unknown.
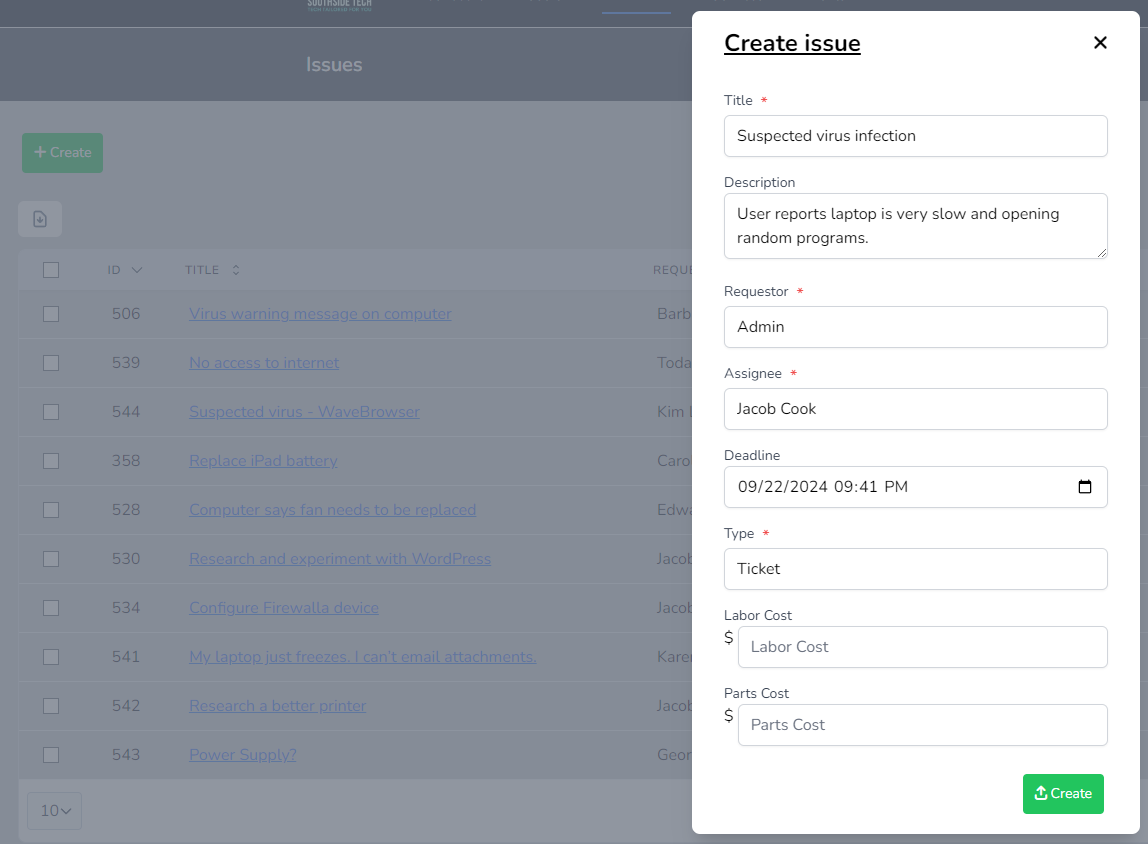
What’s on an issue
You can set or edit:
- Title and description
- Who created it, who requested it (the customer), and who’s responsible (assignee)
- Team
- Deadline
- Issue type — e.g. Repair, Consultation (configured under Issue types in the app)
- Status — e.g. New, In progress, Done (configured under Issue status options in the app)
- Labor time
- When the status took effect
- Location
- Billing info — name, address, phone (used on estimates, invoices, and receipts)
You can add tags and the app keeps an activity log of changes. Keep statuses up to date so customers and the team always know the state of an issue.
Priority
Every issue has a priority level (for example Low / Medium / High). Priority is required when creating an issue and can be changed when editing. Admins configure levels under Settings → Issue priority levels. See Release v2.15.0 for the full table of defaults.
Stale tickets
When enabled under Settings → Issue settings, issues that stay unviewed longer than your threshold are marked stale. The dashboard shows a count for your assignee queue, and the issues table supports filters so you can focus on stale work. See Release v2.15.0.
Tags for triage
Use tags to classify issues. Some workspaces also support structured key–value tags for richer filtering—use whatever fields your admin exposes.
Tasks before closing
Your workspace may require all tasks on an issue to be completed before the issue can be closed. If closing is blocked, open the Tasks section, finish remaining items, then try again.
Purchase orders and tracking tips
Purchase orders and tracking tips often open in a right slideover from the issue list or issue page so you do not lose your place. Close the slideover when you are done to return to the issue.
Issue toolbar (single-issue view)

From the issue page you can use:
- New event — Create an event linked to the issue in Google Calendar (location is prepopulated from the issue).
- Events — View events linked to the issue.
- Time — Log time on the issue; start/stop the timer to track time spent.
- Service — Add predefined services (with fixed prices) to the issue; they’re included in the total cost below.
- Files — Preview, add, and remove attachments.
- Devices — Create new devices for the issue, or link/unlink existing devices.
- Print — Download or email documents (invoices, orders, estimates).
- Receipt — Prepare and print a receipt for the customer.
- Orders — Build orders from a blank form or templates; add line items (description and price) with a subtotal. You can email, download, or preview (for printing) orders.
Documenting work
- Use the description for the main details and a summary; update it as the issue progresses.
- Use comments to document work step by step. Comments can be edited and deleted.
- Mention staff (e.g. @name) in comments so they get a notification.
Billing & documents
From an issue you can generate:
- Estimate — a quote (PDF)
- Invoice — a bill (PDF); can be sent to QuickBooks if you use it
- Receipt — proof of payment (PDF)
- Order — work order or parts order (PDF)
- Purchase orders — create and manage POs; some roles can preview them
The billing name and address on the issue are used on these documents. You can apply customer credits when recording payment (see Credits).
Logging payments
- Click Show Billing on the issue.
- Enter negative amounts for payments and choose the payment types.
- Ensure the issue is paid in full before closing it.
Closing issues
- Only close an issue when the work is done and the customer has paid in full. Otherwise keep it open with a status like Pending requestor or Pending payment.
- Before closing, make sure approximate time for all involved techs is logged on the issue.
- If the app says tasks are incomplete, finish all required tasks first (when your workspace enforces tasks before close).
Child issues
You can create child issues (sub-tasks or follow-up jobs) linked to a main issue. They appear in the Child issues section on the issue page.
Email notifications
You get email notifications when you’re assigned to an issue, mentioned in a comment, and in other cases. Configure this in your notification preferences.
- Open Profile → Alerts & notifications to choose channels and categories.
- Open the full Notifications list from the main navigation to review history and mark items read. Optional realtime updates appear when your organization enables them. See Notifications.
Guest issue submissions
Customers can submit issues without logging in via the external submission form (e.g. linked from your website). When someone submits:
- An email is sent to the admin.
- The new issue is assigned to an available tech (depending on your setup).
Who can see and do what
Access to issues is controlled by roles. If you don’t see the Issues menu or certain actions (e.g. purchase orders), your role may not include those permissions—check with your admin.